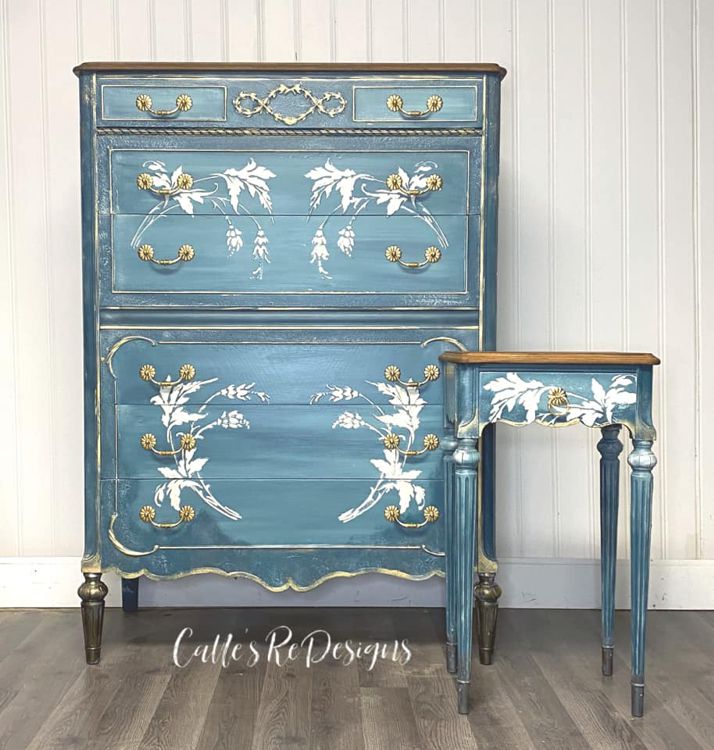
I was just blown away when Colten sent me this photo of an old vanity dresser that was given new life.
Painting it soft cream, our Raised Plaster Parkland Posey Stencil was applied to the sides of the dresser then painted over with the same cream paint. The handles were removed from the lower drawers and gray diamonds were painted over the fronts to give an really cool design element.
All of the ornate ornamentation on this piece and the plaster design really popped out when gray glaze was applied over these areas and wiped off to remove the excess. This piece is now museum worth and how I would LOVE to have it in my all white bedroom!
Darla Dawald has been a long time Victoria Larsen customer. I love it when she shares her creations with us. Who wouldn’t be inspired by her lovely work?
She shared these wonderful tables with us where she used our Plaster Lizard Texture Stencil on table tops. Wow, don’t they look high end?
Raised Plaster Lizard Texture Stencil
Look how lovely and ultra detailed the surface came out!
In her email, she lists exactly what she did for you:
Hi Victoria,
I wanted to share the completed end tables with the VL Crocodile stencil with raised plaster, with you.
I used Snow White general finishes paint on body, then I painted the top in a dark gray. Tinted the plaster with black acrylic paint to make it dark gray. Applied the stencil 3 times across the center then taped off sections to complete the raised plaster stencil on top and bottom 6 times. It took some time but I’m happy with the result.
I then used the modern masters metallics in platinum with glaze. After it dried I used the silver tinted slightly with black as a glaze to achieve the depth. I poly sealed it in satin General Finishes with 4 clear coats on the top only. The General Finishes chalk paint on the body doesn’t require waxing or seal (which I love).
Just listed them for sale.
Feel free to use my photos.
Darla Dawald
Darla’s techniques can be used on any piece of furniture or even to create a high end looking accent wall in a powder room. I love how it came out! Don’t you?
Cindy had always wanted a tile back splash and when she saw our Raised Plaster Standard Brick Stencil, she knew exactly how she was going to get it without cutting tiles, without mortar, without the mess and hassle.
You could do an entire wall with this great and easy to use stencil! Here’s how:
Simply paint the wall the color you would want your grout to be. Tape the stencil to the wall and smooth pre-mixed joint compound over the stencil openings. You can make the tiles look like stone tiles by simply leaving them more rough, but Cindy smoothed hers.
Once the first repeat is dry, line up the stencil and do it again, repeating this process until you have covered the entire desired area.
Now, give it a coat of polycrylic (which doesn’t yellow) to seal it against dirt and dust and you’re done!
Great job Cindy and it looks so real!