The way I would re-create this look is to allow the plaster stenciled area to dry completely, then paint over the entire wall in her luscious warm brown color mixed with a little clear wall glaze.
When I came to the area of the stencil, I would then use a terry cloth towel and wipe off just the design to reveal a much lighter version of the design.
I love the simplistic approach of creating just one element here and there. But I also really love covering an entire wall in a random pattern, turning the design upside down with every other repeat to create further interest.
Calle’s ReDesign Furniture has discovered our Raised Plaster Stencils! This gal is amazing when it comes to re-designing old furniture and giving it new life. The colors she uses, the placement of the designs and her awesome finishes make her pieces one of a kind.
On this piece, she used our Raised Plaster Chantal Frieze Stencil on the front. She flipped and repeated it for a mirrored image (and to create a larger design) then used just a portion of the stencil design in the very center of the repeat.
We’ve all had worn furniture in our lives that we probably left behind or disposed of in some way or another. But Barbara is my kind of gal. A “Rescue Artist”!
This poor little occasional table really needed help. And Barbara was just the gal to give it new life!
She started by painting the top black and then using our Raised Plaster Brassio Frieze Stencil with just metallic paint over the top made it super elegant and just so darned sweet! A coat of light colored paint at the rim of the top, pedistal and legs gave it an awesome new look. Notice how she painted the tips of the legs black? That gives it a coordinated look that is quite smart!
Any of our plaster stencils can be used with paint rather than dimensional products. You’ll just find it to be the most durable, high quality paint stencil you’ve ever owned!
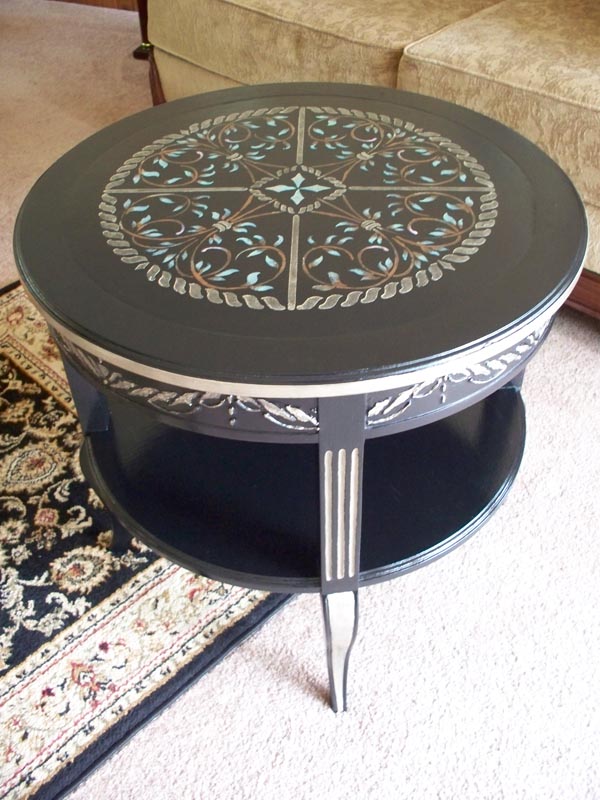
It started out as a dump site find. Solid wood, round, with a single broken leg. Now, how could I resist? I hauled it home and surveyed the damage.
A little wood glue and clamps over night fixed the broken leg and I was ready to get started!
I gave it a good sanding with my electric palm sander and primed it top to bottom.
I then added raised plaster stenciling with wood putty to the sides of the top.
Once dry, I painted the entire table jet black and hand painted the raised designs with metallic gold craft paint.
Using our Raised Plaster Astana Medallion stencil with standard acrylic paints. Yes, you can certainly use any of our raised plaster stencils with just paint.
I centered the stencil on the round top and gave it a gorgeous design.
The table legs and trim also go a lick of gold metallic paint to finalize a beautiful make over of this table.
Now, it looks like a super expensive piece you might find in a specialty shop!
Then using light pressure, dip your stencil brush in to darker gray paint, wipe off the excess and swirl the bristles over the stencil openings.
Turning the stencil each time you repeat it, gives that pretty random effect.
I painted the cabinet trim, the same darker gray paint to match then used the same stencil with joint compound to create a raised design on the cabinet door front. I added black paint to the joint compound to pre-color it.
Simply use a plastic scraper, or even a credit card to smooth the compound over the stencil openings.
Gently un-tape the stencil and peel it back to reveal the raised design. Now, let it dry completely.
I added a cute new handle that I got from Hobby Lobby, moving it to the upper edge of the door for more convenience. Now it’s an adorable storage unit that I will put in my work room!
I’ve been working with Chris Rees with ideas and instruction for adding a plaster bamboo design to her dining room wall for quite awhile. That’s not always easy when you’re trying to do it through just written word, but Chris is an apt student and found exactly what would work for her.
As we wrote one another, I had no clue that this gal was so creative until I began getting her pictures.
She opted for a linen look finish on the wall as a background to her Raised Plaster Bamboo. Streaks of gray made it the perfect backdrop.
Pre-tinting the joint compound gray helped to give the bamboo color. She then used metallic silver paint over every branch and stalk to create the most upscale, elegant wall!
Her leaf sconces were the final touch that made that wall come together beautifully! When her sweet Mother came to visit, her one phrase was: “It’s magical”! Chris was elated. And “magical”, it is indeed.
But was she done? Heck no!!!! She found a cute little corner table and saw the possibilities. Boy, did it need help! But Chris was just the gal to give it new life.
A good sanding was the first order of business.
A fresh paint finish with a new handle took the piece in the right direction. A raised plaster bamboo sprig on the door, surrounded by a black painted frame made this table a one of a kind treasure! Notice how the background finish behind the bamboo design is metallic? Brilliant!
More of Chris’s projects will be featured soon. Wait until you see the tea tray turned bathroom sink! Wow!
I kept seeing this broken round table at a dump site and finally wound up putting it in my jeep and hauling it home.
One of the legs was broken so I glued it back together with wood glue and clamps and by the next day, it was good as new.
After a good sanding with my handy electric palm sander, I decided to embellish it with plaster stenciling. Using wood putty instead of joint compound creates a rock hard design that will stand abuse.
I repeated the design all the way around the table.
After painting the entire table black, I began by painting the raised design with gold acrylic paint.
Now the top needed something special as well so I used our Raised Plaster Astana Medallion Stencil with acrylic paints instead of joint compound to create a medallion on the top of the table.
Victoria Larsen Stencils was the first to introduce you to Raised Plaster Stencils in 2004
and has been the leader ever since with this unique and innovative decorating technique. If you can spread frosting, you can create stunning, raised designs on just about any surface, including walls, ceilings, furniture, cabinetry and craft items.
We’re also the first to introduce you to creating high end plaster ceiling and wall designs with our unique line of plaster molds.
Our classic designs and easy How To instructions help you create elegant and beautiful home decor to help you create the home of your dreams.
For awesome ideas, check out the Decorating Gallery and see what others are doing with our designs.