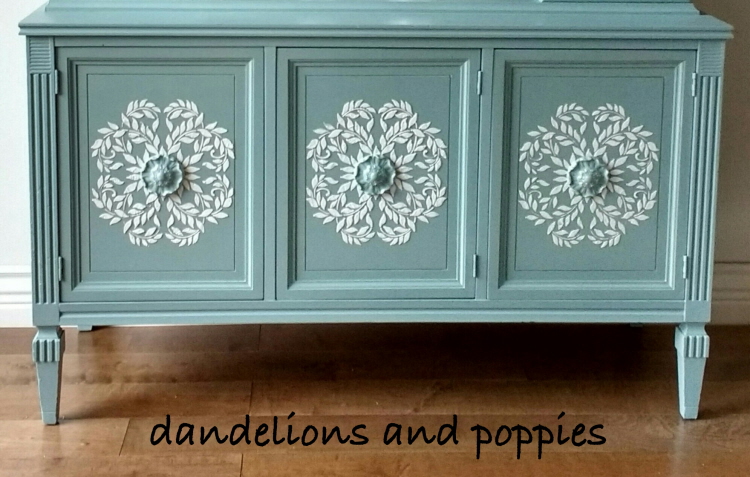
Painting the design with metallic gold paint gave it almost an oriental style beauty. She evidently used a portion of another smaller design as accents to the main lilac design. I love how it came out!
Here’s a tip for painting gold over plaster stenciling: Do the stenciling first, let it dry, paint the piece your intended color and THEN paint the design gold. If you try to paint metallic colors over dried joint compound, it will simply suck up all that beautiful gleam!
Anne used our Raised Plaster Traditional Cabinet Stencil with ordinary paint to add such a luscious design to the front of her cabinet. I love how it looks! She added such ornamental beauty to the two plain panels.
The cool thing about this design is that it repeats easily with tiny flowers, bells and pearls to create a very intricate pattern. It’s perfect for this piece because of the ornamentals already present.
This little desk got the most adorable make over when Joyce used our Chinese Rose Tree Stencil Set over the top of the desk.
I love the very neutral brown she used for the main body of the desk and then did the drawers in a delicate blue. Notice the nobs are also painted brown to coordinate.
On the top of the desk, she created the look of chinoiserie by repeating the trunk stencil, adding leaves and roses and finally adding the tropical bird in the same pale blue she used for the drawers.
What a fun and unusual make over!
Visit her website and facebook page for more fun ideas!
She first added the raised stencil to the upper sides of the cabinet then painted the entire cabinet with silver paint.
The raised design gave it even more decorative appeal. I love the elegance this piece now has and obviously, Michelle is very proud of it. I can see why!
The question “can you use plaster stencils with paint?” comes up all the time. The answer is Absolutely! We use our plaster stencils with paint regularly. What you will simply find is that our plaster stencils will be the most durable, high quality painting stencils you have ever owned!
The stencil set includes the medallion stencil and a round plaster mold to create the inner medallion you see attached in the center.
With the stenciled medallion done in white and the plaster medallion painted the same color she painted the chest, the look is so elegant!
Would you like to learn how to make over pieces like this? Join the FurniturePaintingUniversity.com where for a very small monthly fee, you will open up a world of professional techniques, ideas, inspiration and even articles on selling your creations!
If you’ve ever thought of creating a side-line business of painted furniture, this is the place to start your new business!
I love my neighbor Chris Saavedra. A beautiful, fabulously charming woman whom I enjoy spending time with.
This year, Chris began re-doing old furniture to sell at craft fairs. So what a perfect time to introduce her to the art of stenciling.
She went NUTS! Just about every piece she produced was embellished with a stencil design that made the piece even more special.
This coffee table project was one of my favorites. She painted the base and legs white, painted the top brown then added one of our stencil designs to the very center. It came out so beautiful that I nearly lugged it home for myself! Isn’t it just sweet?
She did well at the craft fair with some pieces selling for as high as $150.00
Chrystal Every Thomas found our plaster stencils and went to town on her Craigslist furniture finds.
OK, I’m deeply impressed!
Plaster stenciled chest
Chrystal found this chest on Craigslist and gave it a make over using our Raised Plaster Marcelle Border Stencil. She shows us how the full border can be used across the fronts of the drawers and then how a portion of the design can be taped off (to create a smaller design) and used in the corners of the doors. This is a truly “designer” look and Chrystal obviously is a “designer” in her own right.
Using the same plaster stencil design, she did a make over on this cute little table as well.
She used the design in just one corner, pre-tinting the medium pink. Now how precious is that????
Yes, I really did find it at the end of my road, laying there on the ground. No seat, just a frame of nasty wood.
I HAD to haul it home and do something with it.
I’d seen on Facebook where people were turning old chairs like this in to garden planters, but that didn’t really hit me as a fun project to do.
I thought “princess chair” because it’s such a small chair and perfect for a little girl to sit on.
I first sanded and primed it, then decided it needed plaster stenciling to create a raised design on the back rails and around the bottom.
On furniture, I like to use pre-mixed tile grout because it dries rock hard and stays put.
I applied the grout to the stencil and then peeled it off to reveal the new design.
There are some strange holes on the fronts of the legs and I just happened to have two cute rose droplet resin appliques that would be perfect to cover the top two holes. I glued them in to place.
I then painted the entire chair and it’s embellishments with gray paint.
To create a new seat, I cut plywood to match the top of the chair.
I then used one of my new stencils to add a pretty design in metallic gold paint to a section of gray satin I had lying around in my material box.
I cut foam rubber to match the seat size, then created the finished seat with my electric staple gun. Tug, staple, tug, staple and it was done!
I finished the chair by replacing the stencil over the raised designs and stenciled them with the same metallic gold paint, adding it to the resin appliques as well. I added antique brown wax at various edges of the chair to give it more detail, blending well with an old terry towel.
The finishing touch was to glue gold fabric cord to the bottom edge of the cushion to complete the look.