Check out Julie McDowell’s awesome new video tutorial using our plaster stencils and molds here:
Plaster stencils are fun and so beautiful, and stenciling with plaster is super easy.
If you can smear frosting on the top of a cake, you can do it!
Though nearly all stencils can be used with plasters, most won’t hold up to plaster use. We use only 14 mil, super heavy duty mylar for our Raised Plaster Stencils because it holds up so well to repeated use and troweling. The pros and faux finish schools prefer them because of their superb durability.
We use common, pre-mixed joint compound that you can find in any home/hardware store in the paint section. It comes in convenient buckets. Just take the lid off and go to work. You can also use venetian plasters or any dimensional medium such as molding paste. I’ve even plaster stenciled with tile grout and concrete!
Joint compound dries pure white, but you can pre-color it with any water based paint such as craft, wall paint, and water based tints.
Choose the darkest version of your intended color as possible. Since the joint compound is white, it will be like adding white paint to any color you chose so it will dry lighter than you expect. Keeping the color choice very dark allows you to develop colored compound without the risk of watering it down too much. Making it too thin with color will prevent that beautiful high “raise” we love with plaster stenciling.
Begin by choosing where you plan to plaster your design. Plaster stenciling can be done over any wall paint (including high gloss), wood, furniture, cabinetry and craft items. It doesn’t do well on glass, mirror or metal. They’re too slick and non-porous.
What you will need:
Plaster Stencil
Masking or painters tape
Plastic 2″ or wider scraper or small plaster trowel
To begin, tape the stencil in place to the intended area.
If you are pre-tinting the joint compound, put some in a separate container before tinting. If you choose not to tint it, but to paint it later, simply use it right out of the bucket.

Scoop a small amount of joint compound on to your scraper or trowel. Tilt it to about 45 degrees and then lay the edge of the scraper on the stencil and drag the compound over the stencil openings using a medium amount of pressure. Try to work in the direction of the design wherever possible. On this medallion, I’m working from the outer edge toward the center.
Scrape the compound even with the stencil. This forces the compound down in to all the tiny openings to give you a clear, crisp image. With large openings, use your fingers to hold the opening down as you plaster to prevent it from raising up.
Now, if you want your design thicker (with a higher profile), without removing the stencil, pile on more compound. I get mine up to 1/2″ thick on larger designs and over 1/4″ on designs with smaller openings.
Untape the stencil and while holding down one edge, peel the stencil back gently (do not just lift it off the wall).
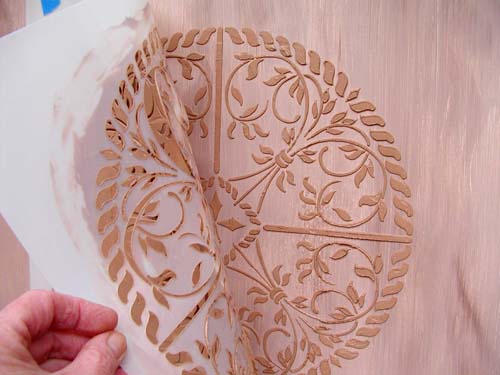
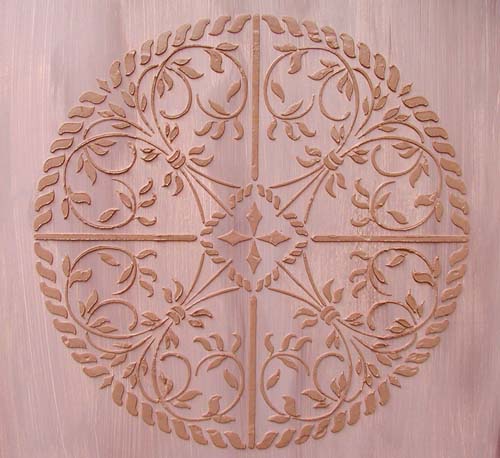
Tah Dah! There’s the raised design in all it’s glory!
If you wind up with peaks or ridges that you don’t like, or if you pressed a little too hard and it bled up under the stencil openings, simply wipe it away with a Q-tip. Ridges and peaks can simply be wiped with a damp sponge after it has completely dried.
Now, let it dry completely. This usually takes about 45 minutes to an hour before doing a repeat right next to it. (As in the case of a repeated border or wallpaper stencil design).
I like to seal my designs with clear translucent wall glaze to protect them. You can purchase this in paint departments of major home stores or even at Walmart.
Another option to color your design is to paint over it with wall paint or glaze to seal, and then to use a stencil or artists brush to add color. You can either place the stencil back over the design, or simply touch the raised design with the brush as I have done in the following photo.

My favorite plaster stencil effect is to simply paint the design the same color as the wall for a more subdued design. You see the beautiful raise with just shadows. It’s a very elegant look.
But you can also paint the designs the same color as the wall then wipe a darker glaze over the top of just the design to bring out the detail.

Plaster stenciling can be done outdoors! The exterior surfaces of your home, planter boxes, deck rails and even stair risers can be decorated with raised plaster stenciling. Simply seal the plaster with exterior paint to protect against the elements.

Now that you know how easy it is, what is your first project?
Alan Ball shows how to stencil with joint compound using a taping motion:
See it here on YouTube.com
He has an interesting way of tapping the joint compound instead of spreading it over the stencil openings to create even more texture. Check it out!
See all of our plaster stencils!